A practical walk-around for spotting collision repairs before you buy
The short version: Inspect a clean, dry car in natural light. Compare the left and right sides, follow every panel gap, sight along the body for ripples, and check hidden edges for overspray or tool marks. If anything looks questionable, arrange an independent pre-purchase inspection.
A repaired vehicle is not automatically a bad purchase. The real questions are how serious the damage was, whether structural or safety systems were affected, and whether the repair was completed correctly. This guide helps you identify clues that deserve a closer look; it is not a substitute for an inspection by an independent qualified technician or collision-repair professional.
Before you begin
Choose the right conditions: Inspect outdoors in bright, even daylight. Avoid rain, wet bodywork, darkness, and harsh spotlights, which can hide paint differences and surface waves.
Start with a clean, dry car: Dirt and water can conceal scratches, overspray, sanding marks, and subtle changes in color or texture.
Bring simple tools: A small flashlight, clean microfiber cloth, tire-pressure gauge, and your phone for notes and photos are useful. A paint-depth gauge is optional.
Do not rush: Walk around the car more than once and view each panel from several angles. Compare suspected areas with the opposite side.
The walk-around inspection
1 Check the car's overall stance
Stand several metres in front of the vehicle, then repeat from the rear. The body should sit level on a flat surface, with the wheels appearing centered in their arches. A leaning body, uneven wheel position, or visibly different ride height can indicate suspension damage, poor repairs, incorrect tire pressure, or heavy loading.
2 Follow every panel gap
Look at the seams around the hood, trunk or liftgate, doors, fenders, bumpers, headlights, and taillights. Gaps should generally be even and consistent from one end to the other. Compare the left and right sides. A narrowing gap, a panel that sits proud or recessed, or a door that needs extra force to close deserves investigation.
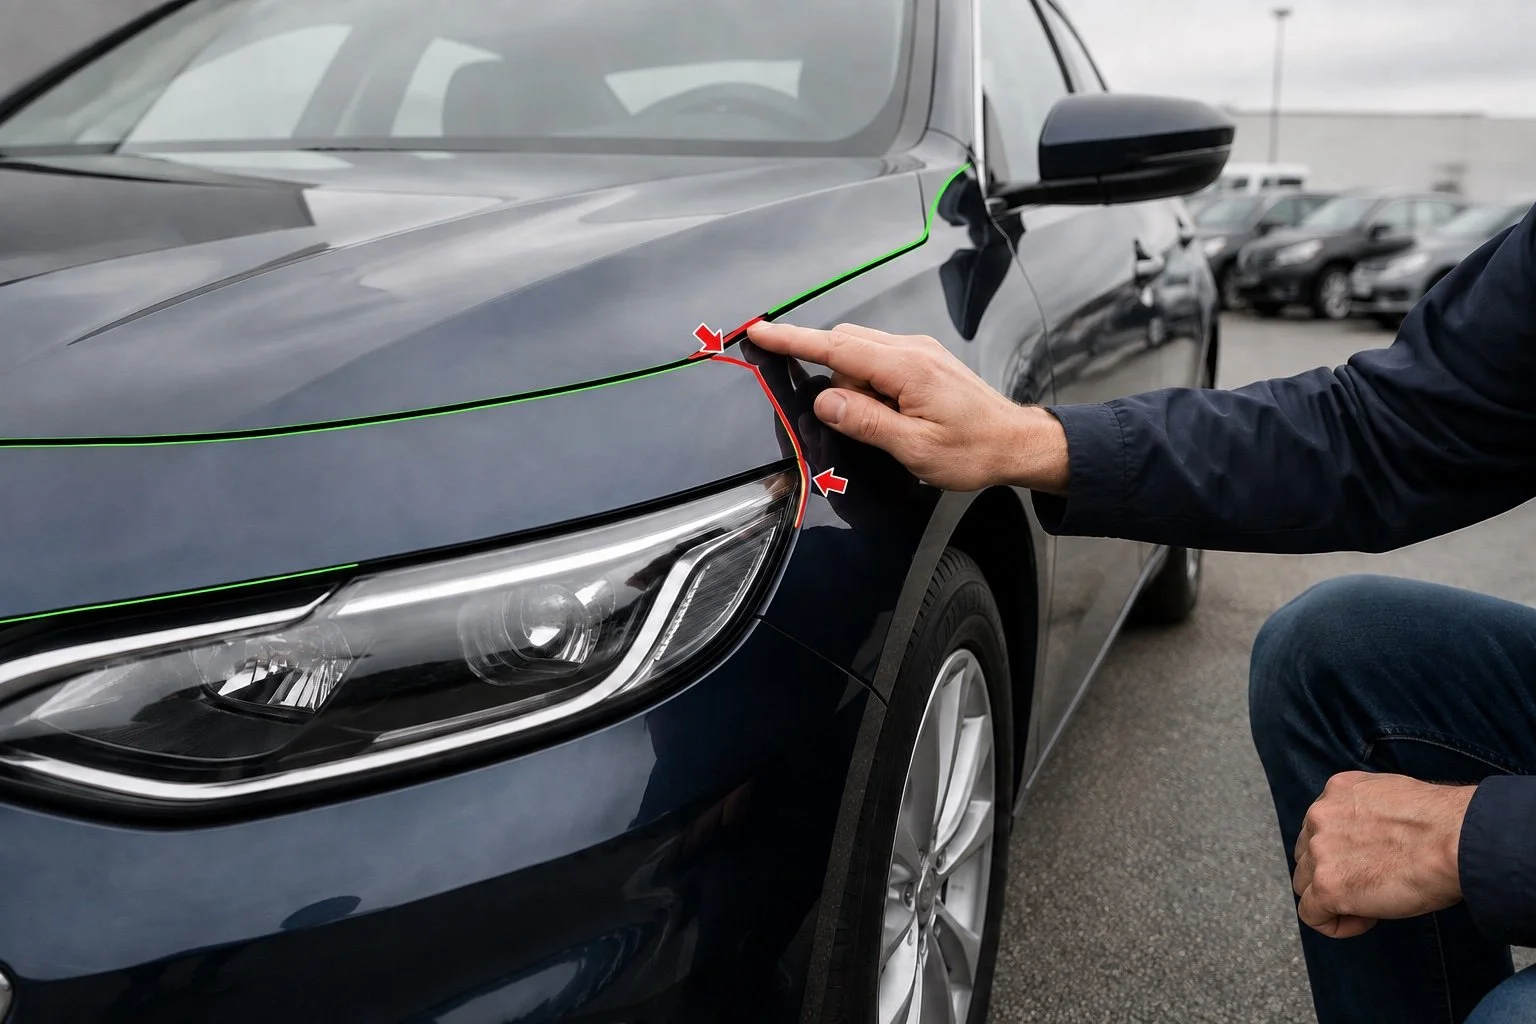
Green follows a consistent seam; red highlights widening or offset gaps that deserve closer inspection.
3 Sight along each side
Move to the front corner and look down the length of the body with your eyes close to panel height. Repeat from the rear corner and on the opposite side. Reflections should flow smoothly. Ripples, flat spots, wavy reflections, or changes in contour can reveal filler, stretched metal, or imperfect panel alignment.
4 Compare the paint
View adjacent panels from different angles and distances. Look for color mismatch, changes in metallic-flake direction, cloudy blending, dull or unusually glossy panels, orange-peel texture that differs from the surrounding finish, sanding marks, dust trapped under clear coat, paint runs, or a hard blend line.

Sight along the body at panel height. A break or wave in a long reflection can reveal previous repair work.
5 Inspect edges and hidden areas
Open the hood, every door, the fuel door, and the trunk or liftgate. Check weatherstrips, hinges, latch hardware, bolt heads, wiring clips, plastic trim, and panel edges. Overspray on rubber or fasteners, paint lines under seals, disturbed bolts, missing labels, fresh seam sealer, or mismatched sealant can indicate removal or refinishing.
Look closer at common repair clues
Fasteners and hinges: Factory-installed bolts usually have an undisturbed finish. Scratches, chipped paint, shifted washer marks, or differently colored bolts may show that a hood, fender, door, or trunk lid was adjusted or replaced.
Welds and seam sealer: Compare both sides of the engine bay, trunk floor, door openings, and underbody where visible. Uneven spot welds, grinding marks, lumpy or freshly applied seam sealer, or a different texture on one side can point to collision repair.
Glass, lamps, and labels: Check date codes and manufacturer markings where practical. One newer window or lamp is not proof of a crash—it may have been replaced for chips, theft, or normal damage—but several newer parts in the same corner strengthen the case for closer inspection.
Bumpers and trim: Look for uneven fit, broken clips, loose wheel-arch liners, paint on textured plastic, missing fasteners, or parking sensors that sit at different depths.
Tires and tracking: Uneven tire wear, a steering wheel that is off-center on a straight road, pulling, or vibration may result from alignment or suspension problems. These signs have many causes, but they matter when combined with visible repair clues.
Important: Never crawl beneath a vehicle supported only by a jack. If the underbody needs examination, have the car raised safely on a professional lift.
Using a paint-depth gauge
A paint-depth gauge can help identify refinished panels, but it should be used for comparison—not as a stand-alone verdict. Take several readings on each panel and build a baseline from areas that appear original. A panel with consistently higher readings than its neighbors may have extra paint; very high or highly variable readings can suggest body filler or multiple repair layers.

Hold the gauge flat against the panel and compare several readings across adjacent panels.
Compare like with like: Readings naturally vary by manufacturer, panel, location, coating system, and material. Compare nearby panels and mirrored locations rather than relying on a single universal number.
Know the tool's limits: Some gauges read only steel, while aluminum, plastic, carbon-fibre, and composite panels require compatible equipment or cannot be measured conventionally.
Confirm the pattern: One unusual reading may be technique or surface contamination. Recheck the area and look for matching visual clues before drawing a conclusion.
Red flags that justify a professional inspection and/or walk away!
Possible structural work: Kinks, buckles, non-factory welds, pulled metal, or repairs near frame rails, pillars, the roof, suspension mounting points, or the trunk floor.
Safety-system concerns: An airbag or seat-belt warning light, dashboard seams that look disturbed, mismatched airbag covers, or evidence that pretensioners or sensors have been replaced improperly.
Water entry: Damp carpet, musty odor, staining, corrosion under mats, or water in the spare-wheel well after rear or side repairs.
Multiple clues in one area: For example: mismatched paint, disturbed bolts, a newer lamp, uneven gaps, and fresh seam sealer at the same corner.
Seller resistance: Reluctance to allow an independent inspection, evasive answers about repair history, or pressure to complete the sale immediately.
Before making an offer
Combine the physical inspection with the vehicle identification number, ownership and service records, lien information, recall status, and an available vehicle-history report. Remember that history reports can be incomplete: unreported or privately repaired damage may not appear.
Quick buyer body damage checklist
Check
What you want to see
Panel gaps
Even, consistent, and similar left to right
Reflections
Smooth across the full length of each panel
Paint
Consistent color, gloss, texture, and metallic orientation
Edges and seals
No overspray, tape lines, or unusual paint buildup
Bolts and hinges
No unexplained tool marks or shifted fasteners
Trunk and engine bay
Factory-like welds, seams, sealant, and labels
Road behavior
Tracks straight, no unusual vibration, steering centered
Independent inspection
Seller permits a qualified third party to examine it
The bottom line
No single clue proves that a vehicle suffered serious collision damage. Judge the pattern: the more inconsistencies you find in one area, the more important it is to identify what happened and how it was repaired. A high-quality cosmetic repair may be acceptable; questionable structural or safety-system work is a reason to pause, obtain expert advice, or walk away.
Buyer protection: Where permitted, make your offer conditional on a satisfactory independent inspection. Choose the inspector and request written findings.
If you'd rather not do this yourself, that’s exactly what we're here for. ExactQuest gives you an independent, engineering-based read on a specific car’s condition or a specific market segment — current pricing, what's fair for the Boston market right now, and what to watch for regionally. We can also arrange Level 1 (on-site) and/or Level 2 (on lift) PPIs depending on service selected.
Schedule a free, no-obligation consultation and we'll walk through what makes sense for the car you are interested in. If you are not sure whether paid advice is worth it for you, run a total cost of ownership calculator and see if our fee makes sense to you.
We don't sell cars, and we don't take commissions or referral fees from any seller. We only work for you, the buyer.
About the author: I’m a retired engineer, lifelong automotive enthusiast, and founder of ExactQuest. I bring an engineering mindset to used-car buying—digging into vehicle history, reliability, market value, and probable downstream ownership costs to help buyers make better-informed decisions from a total cost of ownership perspective.
© ExactQuest LLC 2026